


Are you looking for a nail design that’s both warm and versatile? Caramel nail design is a favorite among nail lovers. It offers many styles, from simple to fancy.
Caramel nails have warm, light brown colors. They can be solid or mixed with nail art. This includes marble and glitter effects.
In this article, we’ll show you how to get different caramel nail looks. We’ll guide you to make salon-perfect designs at home.
Key Takeaways
- Understand the versatility of caramel nails
- Learn how to achieve marble and glitter effects
- Discover tips for creating salon-perfect caramel nails at home
- Explore different caramel nail design ideas
- Master the art of layering nail art
Sweet Caramel Dessert Nails
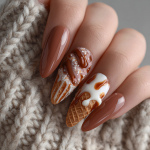
Explore the sweet world of caramel dessert nails. Each detail is a treat for the eyes. These nails are inspired by caramel desserts, making them a unique trend in nail art.


These nails have shades of golden brown, creamy whites, and deep amber. They look like caramel sauces and desserts. The art in these nails can be simple or very detailed, like caramel swirls on a dessert.
Products I love and recommend
To get Sweet Caramel Dessert Nails at home, you need a few things. Start with a base coat to protect your nails. Then, use creamy white or golden brown polish.
For detailed designs, use nail guides or stickers. They help create patterns like caramel desserts.
Recommended Products:
- Nail polish in shades of caramel and cream
- Nail art brushes for detailed designs
- Nail guides or stickers for patterns
- A top coat to seal and add shine


Gel Nail Polish Set of 6
8,99$

Nail Art Stickers 3D
8,19$
Start by trying different polish colors and techniques. Layering or using sponges can create textured effects. With creativity and patience, you can get a trendy and sweet look.
To make your Sweet Caramel Dessert Nails even better, add some glamour. Try glitter on top or a nail charm in dessert shape. This will make your nails stand out as a nail art masterpiece.
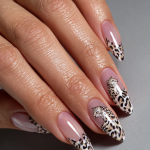
Caramel Tortoiseshell Nail
The Caramel Tortoiseshell Nail design is a nail art masterpiece. It mixes caramel’s warmth with the classic tortoiseshell pattern. This look is stylish and sophisticated, great for anyone wanting to upgrade their nails.


To get this look, start with the right colors. Use a caramel nail polish as the base. Then, layer it with tortoiseshell patterns in brown, gold, and black.
Recreate the look
To recreate this look, follow these steps:
- Apply a base coat to protect your nails.
- Paint two coats of caramel nail polish.
- Use a nail art brush to create the tortoiseshell pattern with “Tortoiseshell Temptation.”
- Seal the design with a top coat.
Here’s a comparison of different caramel nail polish shades you can use for this design:
With these tips, you’ll get a stunning Caramel Tortoiseshell Nail. It’s sure to impress. Try different caramel nails ideas to make it your own.
Caramel Marble Nails
Caramel Marble Nails are a stunning nail art design. They mix caramel’s warmth with marble’s elegance. This look is sophisticated and eye-catching, perfect for anyone wanting to upgrade their nails.


To get the Caramel Marble Nail design, you can use different nail art techniques. One way is to layer caramel-colored polish with clear topcoat for a marbled look. You can also use nail guides or stickers for a precise marble pattern.
Products I Love and Recommend
For a flawless Caramel Marble Nail design, you need the right products. Here are some of my favorites:
- Caramel-colored nail polish: Choose a high-quality, creamy polish in caramel. Good options include Essie Autumn Leaves and Sally Hansen Insta-Dri in Caramel Delight.
- Nail art brushes: You’ll need a nail art brush with synthetic bristles for the marbled effect. Look for ones with fine tips for better control.
- Clear topcoat: A good clear topcoat seals your design and adds shine. Try Seche Vite Dry Fast Top Coat or Sally Hansen Miracle Nail Thickener.
By using these products and techniques, you can get a beautiful Caramel Marble Nail design. It’s perfect for a subtle look or a bold statement. This design is sure to inspire.
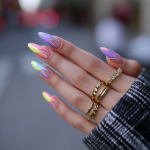
Caramel Ombre Nails
Caramel Ombre Nails are all the rage in nail art. They feature a gradient of caramel colors for an ombre look. This trend is loved by many.


To get this look, you can use sponges or special brushes. The goal is to mix the colors smoothly. This makes the transition from one shade to another look great.
Products you’ll need
For perfect caramel ombre nails, you need some key products. Here are my top picks:
- Nail polish in various caramel shades
- A makeup sponge for blending
- A nail brush for precise application
- A top coat to seal the design
Here’s how to do Caramel Ombre Nails:
- Start with a base coat on your nails.
- Paint a light caramel shade as the base.
- Use a makeup sponge to add a darker caramel shade. Start at the tip and move down.
- Blend the colors for a smooth ombre effect.
- Seal it with a top coat.
Follow these steps and use the right products. You’ll get a stunning caramel ombre nail design. It’s perfect for any event.
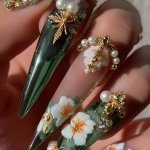
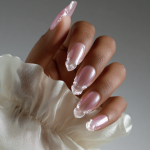
Caramel Nails with Glam Accents
Make your caramel nails stand out with glamorous touches. Glam accents can make your nails perfect for big events. It’s great for those who love luxury in their nail art.


To get caramel nails with glam accents, follow these steps:
- Start with a base coat to protect your nails.
- Apply a caramel-colored nail polish as the base color.
- Use glitter, rhinestones, or metallic nail polish to add glam accents.
- Seal your design with a top coat to ensure longevity.
Products I Love and Recommend
Here are some must-haves for this stunning look:
- Caramel-colored nail polish: Try CANNI Brown Gel Nail Polish Caramel Coffee Brown
- Glitter top coat: This Glitter Gel Top Coat adds a beautiful sparkle.
- Rhinestones: Use these ones or find something similar for luxury vibe.
Adding glam accents to your caramel nails makes them unique and stunning. Try different glitter, rhinestones, and metallic polish to find your perfect look for special occasions.
Minimal Caramel Elegance
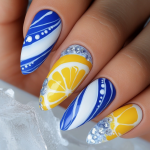
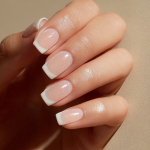
Minimal caramel elegance is all about simplicity and warm caramel tones. It’s great for those who love simple yet classy beauty. It shows off caramel colors in a quiet way.


To get this look, skip the fancy designs. Go for clean lines, simple patterns, and lots of caramel colors. A single coat of caramel nail polish can be enough to make a statement. Pair caramel with beige or soft pink for extra class, for the last step, add some slim white lines.
Key Products for the Look
You’ll need a few key items for this look. Here’s what you need:
- A caramel-colored nail polish
- A neutral shade nail polish for contrast
- A white nail polish (very slim brush)
- A top coat to seal and protect your nails
Try different finishes like matte or glossy top coats. Adding a subtle glitter on top can also enhance the elegance of your caramel nails.
To get this look, start with a base coat. Then, apply one or two coats of your chosen caramel polish. Finish with a top coat. For extra class, add a simple nail art design in a neutral shade and a white line. Keep it simple so the caramel color can be the star.
Minimal caramel elegance is a stylish and sophisticated nail design. It’s perfect for any event or to just make your everyday look better. This style is sure to inspire you.
Conclusion
Caramel nails are very popular in nail art. They offer a blank space for many designs and techniques. You can go for sweet dessert nails or simple elegance.
The best caramel nails show off your personal style. You can choose bold glam or soft ombre effects. The trend keeps changing with new ideas.
To keep up with the trend, try out different looks. Find what looks good on you. With the right tools and creativity, you can get salon-quality nails at home.