

Nail art is big in the beauty world. Vibrant nail designs and trendy nail colors are very popular.
Want to change up your nails? There are so many colorful nails ideas out there. It’s hard to pick just one.
This article will show you 10 bright and trendy nail designs. They will help you make your nails look amazing.
Key Takeaways
- Discover the latest trendy nail colors to try this season
- Learn how to create vibrant nail designs at home
- Get inspiration from the top 10 colorful nails ideas
- Understand the significance of nail art in the beauty world
- Find out how to make your manicure game stand out
The Vibrant Revolution: Why Colorful Nails Are Taking Over
The nail industry is seeing a big change. People want bold and fun nail art. Colorful nails are more than a trend. They show who you are.
Color Psychology: What Your Nail Shade Says About You
Your nail color can tell a lot about you. Bold reds and oranges show confidence and energy. Soft pastels are for those who like to be creative and subtle.
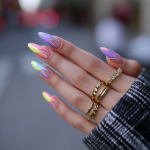
Rainbow French Tips: Not Your Grandmother’s Manicure
Rainbow French tips mix old charm with new style. They are perfect for anyone who loves nails. This look is all about bright colors and fun designs.


You don’t need to be a pro to try this look. With the right tools and practice, you can make nails that stand out. Just remember to have fun and be creative.
Paint the Rainbow: Step-by-Step Application Guide
It’s easy to make rainbow French tips. Here’s how:
- Start with a base coat on your nails.
- Put a white tip on each nail using a guide or your hand.
- Paint each nail a different color of the rainbow.
- Seal it all with a top coat.
Tools of the Trade: Brushes and Polishes for Perfect Lines
You need the right tools for clean lines. Look for polishes that show color well and brushes that are precise.
| Tool | Description | Benefit |
|---|---|---|
| Nail Guide | A sticker or tape for straight edges | Helps get a precise tip |
| Nail Brush | A fine brush for details | Allows for precise color |
| Rainbow Polishes | Bright, vibrant colors | Adds fun to your design |
From Office to Party: When to Rock Rainbow Tips
Rainbow French tips are fun for any time. For work, use softer colors or just one bright nail. For parties, go bold with lots of colors.
“Nail art is a way to express yourself and have fun with fashion. Rainbow French tips are a great way to add a pop of color to your look.” – Celebrity Nail Artist
Follow these tips and be creative. You can wear rainbow French tips anywhere, from work to parties.
Neon Color Blocking: Geometry Class Never Looked This Good
Neon color blocking is changing nail art with bold, geometric designs. It’s all about making a statement with bright nail designs.


To get this look, you need the right tools. Sharp Edges, Bright Ideas: Essential Tools for Clean Lines are key for a perfect application.
Sharp Edges, Bright Ideas: Essential Tools for Clean Lines
For sharp lines, use nail guides or stickers. They help you get a clean, geometric design. A fine-tip nail art brush is also good for detailed designs.
Color Theory 101: Combinations That Make Eyes Pop
Choosing the right colors is important in neon color blocking. Try neon pink with electric blue or yellow with green. These combos are vibrant and work well together.
| Color Combination | Description |
|---|---|
| Neon Pink & Electric Blue | A bold and playful combination that’s perfect for summer. |
| Yellow & Green | A bright and zesty duo that’s great for spring. |
| Neon Orange & Purple | A vibrant and energetic pair that’s ideal for a night out. |
Sealed and Delivered: Making Your Design Last Through the Week
To keep your design looking good, apply a top coat. It seals in your design and prevents chipping and fading. This way, your nail art stays bright all week.
By using these tips, you can make a trendy nail color look. It’s perfect for festivals or just to spice up your daily look. Neon color blocking is a fun choice.
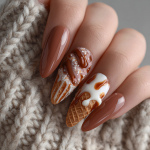
Ombré Sunset Nails: Carrying the Sky on Your Fingertips
Sunsets inspire us, and now, we can wear them on our nails. Ombré sunset nails bring the sunset’s colors and gradient to your fingers.


Sponge Bob Square Nails: Perfecting the Gradient Technique
Getting the ombré look right takes some skill. A sponge helps blend colors. Start with a base coat, then dab colors on the nail with a sponge.
Blend the colors by dabbing the sponge gently. This makes the colors flow smoothly from one to another.
Dawn to Dusk: Color Palettes for Different Moods
Ombré sunset nails are very flexible. You can pick colors for any mood or event. For a soft look, try pastel shades. For something bold, choose vibrant oranges and yellows.
| Mood | Color Palette |
|---|---|
| Romantic | Pastel pinks, blush tones |
| Bold Statement | Vibrant oranges, yellows |
| Edgy | Deep purples, reds |
Twinkle Twinkle: Adding Glitter for Starry Night Effects
To make your nails even more special, add glitter. It gives a starry night look, adding depth. Choose glitter polish that matches your colors.
Now you’re all set to try ombré sunset nails. It’s a fun nail art idea or a creative manicure inspiration.
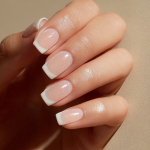
Colorful Nails Ideas for the Subtle Showoff
Colorful nails don’t have to be loud. Sometimes, a little color can say a lot. There are many stylish ways to add color without being too bold.


The Art of Nothing: Negative Space Designs That Speak Volumes
Negative space nail art uses empty space for a modern look. It’s simple yet elegant. It’s great for geometric patterns or simple designs.


One-Hit Wonders: Making a Statement with a Single Accent Nail
Accent nails let you add color without going all out. Paint one nail in a bold color. It makes a big impact without overwhelming.


Micro Moments: Tiny Colorful Details on Neutral Canvases
For a quiet look, add small colorful touches to a neutral base. A small stripe or dot in a bright color works well. It’s subtle yet catches the eye.


| Nail Design | Description | Best For |
|---|---|---|
| Negative Space | Embracing empty space for a modern look | Those who prefer understated elegance |
| Accent Nail | A single nail in a bold, bright hue | Individuals looking to add a pop of color |
| Micro Details | Tiny colorful details on a neutral background | Anyone seeking a subtle yet stylish manicure |
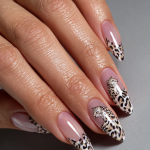
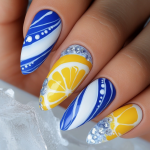
Fruit Salad Fingers: Deliciously Vibrant Nail Art
Nail art just got a whole lot tastier with the Fruit Salad Fingers trend. This vibrant and fun nail art involves painting your nails to resemble a colorful mix of fruits. It’s as playful as it is stylish.
Slice of Life: Watermelon, Citrus, and Berry Designs
Popular fruit designs include watermelon slices, citrus fruits like oranges and lemons, and various types of berries. These designs can be simple or detailed, depending on your skill.


For a watermelon design, paint a green rind at the edge of your nail. Then, fill the center with pink or red polish. Citrus fruits can be painted as half or quarter slices on your nails. Use bright colors like orange, yellow, and green.
Fruity Beginnings: Simple Patterns for Novices
If you’re new to nail art, start with simple patterns. For Fruit Salad Fingers, try basic designs like single fruit slices or simple fruit-inspired patterns.
Five-Minute Watermelon Nails
To create a quick watermelon design, paint a thin green line at the tip of your nail. Then, add a pink or red half-moon shape. Finish with a few white dots to look like seeds.
Easy Citrus Slices Anyone Can Do
For citrus slices, paint a thin white or colored line to outline the slice. Then, fill it with the right color (orange, yellow, etc.). Add texture by dragging a sponge or brush in a gentle, sweeping motion.
Seasonal Harvest: Fruit Designs Throughout the Year
Fruit Salad Fingers can be adapted to any season. In summer, use bright citrus and berries. In fall, add apples and pears. Winter is for cranberries and citrus. Spring is perfect for strawberries and lemons.
| Season | Fruit Designs |
|---|---|
| Summer | Citrus, Berries, Watermelon |
| Fall | Apples, Pears, Cranberries |
| Winter | Cranberries, Citrus |
| Spring | Strawberries, Lemons |
By using seasonal fruits, your nail art stays fresh all year. Whether you’re new or experienced, Fruit Salad Fingers are fun and creative. They let you express your personal style.
Jackson Pollock Would Be Proud: Abstract Splatter Nails
Inspired by Jackson Pollock, abstract splatter nails add chaos to your nails. They turn your nails into tiny art pieces. This trend celebrates creativity.


Splatter Masters: Tools and Techniques for Controlled Chaos
To get the perfect splatter, you need the right tools. Bold nail polish shades in many colors are essential. You’ll also need items like toothbrushes or sponges.
The technique is to flick or dab polish on your nails. This creates a unique, abstract design. Try different colors and tools to find your style.
Color Harmony in Randomness: Combinations That Work
Even though splatter nails are random, some colors work better together. Try blue and orange or red and green for a bold look. For something softer, use pink and purple shades.
The most important thing is to have fun. Try out different colorful nail trends.
| Color Combination | Effect |
|---|---|
| Blue and Orange | Striking contrast |
| Pink and Purple | Soft, analogous look |
From Art Gallery to Office: Making Splatter Nails Wearable
Splatter nails are bold but can be toned down for work. Wear a bold design with a simple outfit. Or use fewer colors for a more subtle look.
Remember, balance is key with any unique nail designs.
“The best way to get started is to dive right in and experiment with different colors and techniques.”
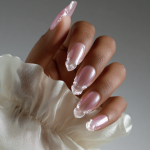
Space Age Sparkle: Holographic and Chrome Finishes
Get ready to explore holographic and chrome nail finishes. They bring eye-catching nail art ideas to life. These finishes shine and sparkle in a way you’ve never seen before.


Mirror, Mirror: Application Methods for Maximum Shine
To get that perfect shine, start with a smooth base coat. Then, apply holographic or chrome polish. Finish with a glossy top coat. Make sure each layer is even and smooth.
Dimension Jumping: Layering Techniques for Depth
Layering is key for depth in your nail art. Start with a base layer that matches your skin. For holographic looks, layering colors adds dimension. Use a sponge or special effect brush to blend colors well.
Base Layer Secrets
A good base layer is vital for your nail art’s longevity. Pick a polish that matches your natural nail or complements the finish you want.
Top Coat Magic Tricks
A top coat is essential for your nail art. For holographic and chrome, use a high-gloss top coat. It seals the color and adds shine.
Monday to Saturday Night: Scaling Holographic Looks for Any Occasion
Holographic nail art is perfect for any day. For a subtle look, add holographic accents to neutral tones. For a bold statement, go all out with holographic or chrome on every nail.
| Occasion | Nail Art | Finish |
|---|---|---|
| Work | Subtle holographic accents | Matte top coat |
| Night Out | Full holographic or chrome | High-gloss top coat |
Groovy Baby: Tie-Dye and Marble Swirls
Step into the vibrant world of tie-dye and marble nail art. Every nail is a canvas for self-expression. This trend is all about embracing fun and creativity.


With tie-dye and marble swirls, you can add a psychedelic touch to your look. It’s perfect for those who love to experiment with their nail art.
Water Works vs. Dry Runs: Marbling Technique Showdown
Marble nail art depends on the technique used. Two popular methods are water marbling and dry marbling. Water marbling involves dropping nail polish into water and then manipulating it to create unique patterns before transferring it to your nails.
Dry marbling uses a special tool or a makeup sponge to create the marbled effect directly on your nails.
Water marbling can be messy and requires practice. But it allows for unique and detailed designs. Dry marbling is more controlled and less messy. But it might lack the uniqueness of water marbling.
| Technique | Pros | Cons |
|---|---|---|
| Water Marbling | Unique designs, detailed patterns | Can be messy, needs practice |
| Dry Marbling | More controlled, less messy | Lacks uniqueness, tricky to master |
Peace, Love, and Polish: Creating Perfect Tie-Dye Effects
Tie-dye nail art is all about creating a colorful, groovy effect. You can use a makeup sponge to dab different colors onto your nails. Or, you can use a special tie-dye nail art tool.
The key is to blend the colors seamlessly. This creates a harmonious palette.
“The art of tie-dye is in the details. It’s about mixing and matching colors to create a look that’s uniquely yours.” – Nail Art Expert
Color Theory for Your Skin Tone: Customization Tips
Choosing the right color palette is key for tie-dye and marble nail art. Colors that complement your skin tone can enhance your look. For cool skin tones, blues and purples create stunning contrasts.
If you have a warm skin tone, oranges and yellows add a vibrant touch.
- For cool skin tones: Blues, purples, and pinks
- For warm skin tones: Oranges, yellows, and corals
- For neutral skin tones: Experiment with a mix of both cool and warm colors
By following these tips and experimenting with different techniques, you can achieve a fun and creative nail art look. Whether you’re heading to a music festival or just want to add some color to your everyday look, tie-dye and marble swirls are sure to turn heads.
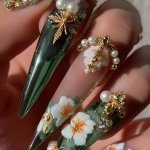
Blooming Brilliant: Floral Explosion Nail Art
Floral patterns are now big in nail art. They’re perfect for bold looks or something cheerful. Your nails are a great place for these designs.


Petal Pushers: Simple Flower Designs for Beginners
Simple flower designs are great for beginners. You can use dotting tools and polish to make them. Start with one color and add more for depth.
Full Botanical Garden: Advanced Floral Patterns
Advanced artists can try a full botanical garden on their nails. It needs detailed designs and color layers.
Dotting Tool Daisy Technique
The dotting tool daisy method uses a dotting tool for the flower center. Then, add petals around it.
Brush Stroke Roses for Experts
Brush stroke roses need a steady hand and a good brush. They’re made by soft, flowing strokes like a real rose.
Four Seasons of Flowers: Inspiration for Year-Round Bloom
Floral nail art fits any season. Spring has pastel colors and cherry blossoms. Summer is bright with sunflowers.
Autumn uses warm colors and dahlias. Winter is icy with silver and blue.
| Season | Floral Inspiration | Color Palette |
|---|---|---|
| Spring | Cherry Blossoms | Pastel Colors |
| Summer | Sunflowers | Bright Colors |
| Autumn | Dahlias | Warm Tones |
| Winter | Silver Accents | Icy Blues |
Conclusion: Your Fingertips, Your Canvas, Your Rules
Trying out colorful nail designs is a fun way to boost your style. You can show off your personality with the many colorful nails ideas out there.
There are bold patterns and soft hues for every event. You can pick from creative manicure inspiration or eye-catching nail art ideas. The most important thing is to have fun and try new things.
Nail art is all about expressing yourself. So, be creative and pick a colorful nail design that’s just for you.